In this entry I cover the painting of a very rusty tongue and the rebuilding process I followed on the Jalousie windows.
 |
| I thought I took a photo of the tongue only but this gives you an idea - rusted and scaly , the old regulator was present as was the OE gas bottle rack and wiring junction box |
 |
| The wiring junction box... I have all the wire to install a 7 pin connector someday very soon |
 |
| The OE gas bottle carrier, I had to cut the bolt off with a cut off wheel, same with the wiring box |
 |
| With those things removed I used a wire wheel on my grinder to remove scale and old paint |
 |
| Hard to get in all the corners and tough to reach areas |
 |
| Did find the Mfg serial number though |
 |
| It took years of unprotected weather to pit the steel like that - too bad |
 |
| I bought this POR 15 kit that include the cleaner and metal etch needed for a good bond - I used a variety of tools and attachments attempting to get the metal as clean as possible prior to the POR 15 application |
 |
| The kit included all the supplies to complete a small job |
 |
| Cleaned and etched |
 |
| Another view, the cleaner and etch made a huge difference in appearance of the old iron |
 |
| Coated with the rust encapsulating paint |
 |
| Looks good except I want a white tongue |
 |
| I was told by the rep that any good quality spray paint will adhere to the paint while tacky |
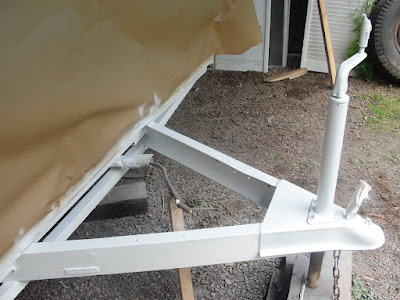 |
It looks okay enough to add the battery tray/box I'll be fabricating and then I'll repaint it with urethane automotive paint
|
I worked on the windows at home with the goal of doing one each evening.... I am an optimist aren't I? It is simple work and I enjoy the detail but did require time to do correctly.
 |
| This is the window AFTER washing it! These were filthy and barnacle encrusted! |
 |
| I found a video on U tube that showed the simplicity of dismantling these |
 |
| Basic hand tools are all that is needed to do the job, you will need a clutch head socket - which I already had due to my old car disease |
 |
| I was able to clean these pretty well although they are a bit corroded in places |
 |
| These rubber pads are all that hold in the panes of glass, simplu remove these and the glass comes right out |
 |
| Here is one of the old rubber pads removed |
 |
| There are several types of gaskets used in these window, felt along each side and rubber top and bottom as well as the rubber pads needed to re-install the glass, I got everything needed and great service at Vintage Trailer Supply. They were great and I will buy from them again! |
 |
| This was rubber at one time, as you can see the weather sealing capability as is would be NONE! |
 |
| These are the clutch head screws needing removal to disassemble the frame |
 |
| After washing but prior to barnacle abrading... |
 |
| I used SOS pads for this step, and then washed with detergent and rinsed well |
 |
| Ta-da! No the SOS pads do not make it look like this - okay I skipped a few steps in the polishing process that I will cover in detail later when I do portions of the skin... it's the same process |
 |
| Here is the same type of rubber installed to seal the bottom pane of glass |
 |
| The louver mechanisms were all frozen, I doused them heavily in penetrating oil to free them up, I then wire brushed the rivets in an attempt to clean the rust from them with some success - they work great now |
 |
| Removing the old felt from the sides |
 |
| The felt and rubber come in cut ot length rolls (?) |
 |
| Much nicer with new material installed |
 |
| The new installation pad material is also cut to size, this works great as not every window pane bracket is the same |
 |
| Installed... |
 |
| Here is how the completed windows look - I am quite happy with the appearance and they now work great |
 |
| A side view, all of the glass is original |


No comments:
Post a Comment